Welcome to CSU's Email System!
The Information Technology department is here to help you manage your email and stay connected. Follow these simple steps to access your email account:
- Open any web browser.
- Go to https://m365.cloud.microsoft or https://www.outlook.com.
- Log in with your CSU email address and password.
What You Can Do with Your CSU Email
- Calendar: Keep track of your schedule and manage meetings effortlessly.
- Contacts: Store and organize your contacts online.
- Groups: Collaborate with teams and groups easily.
- ToDo: Stay on top of your tasks with a handy to-do list and planner.
- OneDrive: Securely store and sync your files.
- CoPilot: Get assistance from our Artificial Intelligence (AI) tool.
By following these steps, you can effectively block unwanted emails and report them to Microsoft, helping to improve overall email security.
Malicious email
Phishing emails are fraudulent messages designed to trick you into revealing personal information, such as passwords, credit card numbers, or account details. These messages may look like they come from trusted sources, but they are malicious in nature and pose a serious security threat.
You can report junk email to Microsoft by blocking the sender. Follow these simple steps to block junk email in Outlook:
- Open Outlook and navigate to your inbox.
- Select the junk email you want to block.
- Click on the Home tab at the top of the screen.
- In the Delete section, click on Block.
- Choose Block Sender from the dropdown menu.
- Do NOT open attachments or click on links from unknown sources.
- Report suspicious emails immediately to the ITD helpdesk at helpdesk@csu.edu or ITDSecurity@csu.edu.
- Block the email using the options available in the Junk Email tab.
- Stay vigilant and help us keep our community safe!
- Check the Sender's Email Address: Phishing emails often come from addresses that look similar to legitimate ones but have slight variations. For example, instead of support@bank.com, it might be support@b4nk.com
- Look for Generic Greetings: Phishing emails often use generic greetings like "Dear Customer" instead of your actual name
- Beware of Urgent Language: Phishing emails often create a sense of urgency or fear, claiming that your account will be suspended or you need to act immediately
- Check for Spelling and Grammar Errors: Many phishing emails contain spelling mistakes or poor grammar
- Verify Links Before Clicking: Hover over any links to see the actual URL. Phishing emails often contain links that look legitimate but lead to malicious sites
- Be Wary of Unsolicited Attachments: Legitimate organizations rarely send unsolicited attachments. If you receive an unexpected attachment, it could be malicious
- Look for Mismatched URLs: Ensure that the URL matches the company's official website. For example, www.bank.com vs. www.bank-secure.com
- Check for Requests for Personal Information: Legitimate companies will not ask for sensitive information like passwords or credit card numbers via email
- Watch for Unusual Requests: Be cautious if the email asks you to perform actions that seem out of the ordinary, such as transferring money or providing login credentials
- Use Security Software: Keep your computer and mobile devices protected with up-to-date security software
By following these tips, you can better protect yourself from phishing attempts. Stay vigilant and remember to report any suspicious emails to the ITD helpdesk at helpdesk@csu.edu or ITDSecurity@csu.edu.
Rules
Outlook allows you to automate actions when emails arrive based on specific conditions such as:
- Sender
- Recipient
- Subject
Some of the popular actions you can automate include:
- Moving the email to a folder
- Deleting the email
- Forwarding the email (with an attachment)
To create a new rule in Outlook, follow these steps:
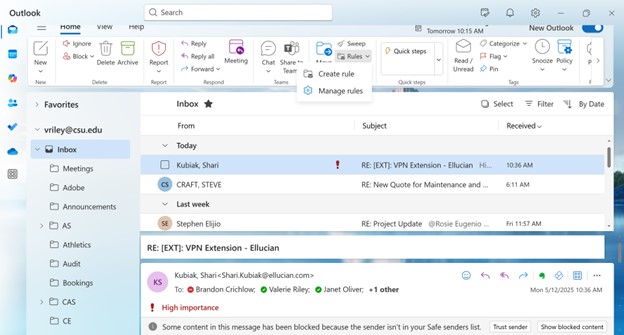
Navigate to the Home Tab:
- Click on the Home tab.
- In the Move section, click on Rules.
- Select Create Rule.
If you want to move it to a different folder, either click the drop-down box and select the desired folder and click the OK button or,
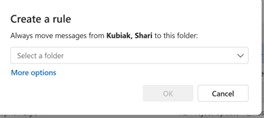
Click the More Options link and select the appropriate values in the appropriate fields and click the Save button.
Meetings
Schedule a meeting
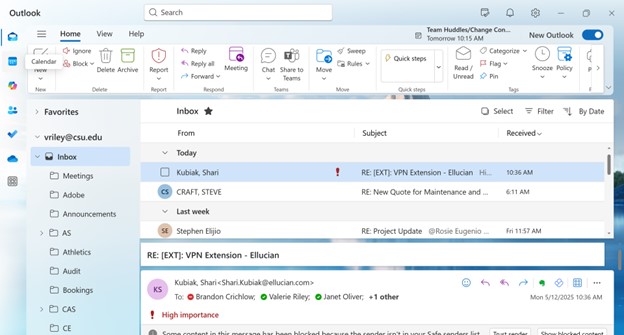
Click the Calendar icon in the left panel
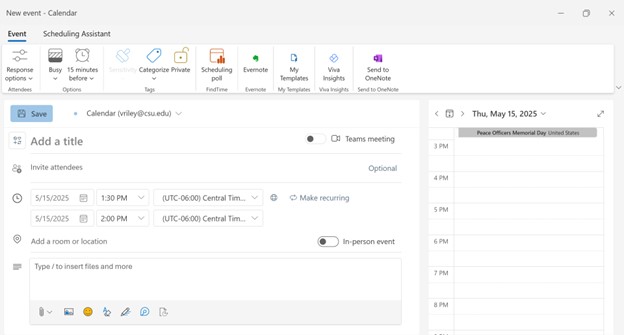
- Title: Enter a descriptive title for your meeting.
- Attendees: Add required and optional attendees by typing their email addresses or selecting them from your contacts.
- Date and Time: Choose the start and end date and time for the meeting. You can also set the meeting as an all-day event or make it recurring.
- Location: Specify the location of the meeting. If this is a Teams meeting (video/audio) click the times button.
- Details: Provide any necessary details about the meeting in the body of the invitation.
- Attachments: Attach relevant documents or files that attendees might need.
- Reminder: Set a reminder to notify attendees before the meeting starts.
- Show As: Choose how the meeting time should be displayed on attendees' calendars (e.g., Busy, Free).
- Recurring Meetings: If you need to schedule regular meetings, set up a recurring meeting to save time.
- Response Options: Ensure you receive responses from attendees by enabling the response options.
- Meeting Rooms: If you need a physical meeting room, use the room finder to book an appropriate space.
Creating a meeting in Outlook 365 is straightforward and helps streamline your scheduling process. By following these steps, you can ensure that your meetings are well-organized and that all attendees have the necessary information.
CoPilot
CoPilot is Microsoft’s cutting-edge Artificial Intelligence (AI) designed to assist you with a variety of tasks. Whether you need help with writing, research, or just have a question, CoPilot is here to provide you with accurate and helpful answers.
How to Use CoPilot:
If you need to sharpen your writing skills, submit a memo, and CoPilot will rewrite it for you, enhancing clarity and style.
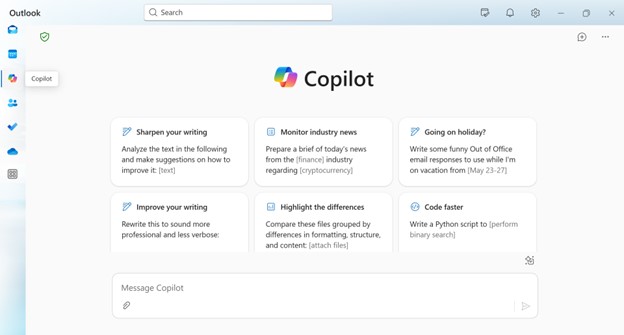
- Versatile Assistance: From answering questions to rewriting text, CoPilot is equipped to handle a wide range of tasks.
- User-Friendly Interface: Easily accessible through the icon in the left panel, making it simple to get the help you need.
- Enhanced Productivity: By providing quick and accurate responses, CoPilot helps you save time and improve your work efficiency.
Contacts
Manage Your Contacts in Outlook
Introduction
Welcome to the Contacts Management page for Outlook! Here, you can learn how to efficiently organize, update, and utilize your contacts to stay connected and productive.
New Contact Features in Outlook 365
- Self-Updating Contacts: For enterprise users, contacts automatically update to ensure you always have the latest information
- Contact Categories: Easily organize, find, and connect with your contacts using customizable categories
- Enhanced Contact Editor: Add, update, and manage your contacts with the new and improved contact editor
- Upgraded People Hub: View, manage, and collaborate with your contacts more efficiently in the upgraded People hub
- Consistency Across Apps: Your contact updates are synchronized between Teams and Outlook, saving you time and effort
- Improved Collaboration: With a cohesive view of your contacts, you can collaborate more effectively across Microsoft 365
- User-Friendly Experience: Annotations and category labels on contacts are reflected across both Teams and Outlook, ensuring a consistent experience
To start using the new contact features, simply log in to your Outlook 365 account and navigate to the People hub. From there, you can explore all the new functions designed to make managing your contacts easier and more efficient.
To access your contacts, click the People icon in the left panel.
To add a new contact:
- Click on "New Contact."
- Fill in the contact details such as name, email, phone number, and address.
- Save the contact by clicking "Save & Close."
To edit an existing contact:
- Select the contact you want to edit.
- Click on "Edit Contact."
- Update the necessary information.
- Save the changes by clicking "Save & Close."
To delete a contact:
- Select the contact you want to delete.
- Click on "Delete."
- Confirm the deletion when prompted.
To organize your contacts:
- Use categories to group similar contacts.
- Create folders for different types of contacts (e.g., personal, work).
- Use the search function to quickly find contacts.
To import contacts:
- Click on "File" and select "Import."
- Choose the file format and follow the prompts to import contacts.
To export contacts:
- Click on "File" and select "Export."
- Choose the file format and follow the prompts to export contacts.
Creating a contact list in Outlook 365 allows you to group contacts together, making it easier to send emails to multiple people at once. Follow these simple steps to create a contact list.
- Navigate to the People Section: Location: Click on the People icon in the bottom-left corner of the Outlook window. This will take you to the contacts section.
- Create a New Contact List: New Contact List: Click on the New Contact dropdown menu and select Contact List.
- Name Your Contact List: Name: Enter a name for your contact list. Choose a name that clearly represents the group of contacts you are adding.
- Add Contacts to the List: Add Members: Click on Add Members and select the contacts you want to include in the list. You can add contacts from your existing contacts or enter new email addresses.
- Save the Contact List: Once you have added all the desired contacts, click Save to create the contact list.
- Sending an Email to the Contact List: Compose Email: When composing a new email, type the name of your contact list in the To field. Outlook will automatically populate the email addresses of all the contacts in the list.
- Managing Your Contact List: Delete: If you no longer need the contact list, you can delete it by selecting the list and clicking Delete.
- Efficiency: Save time by sending emails to multiple contacts at once.
- Organization: Keep your contacts organized by grouping them into lists based on projects, teams, or other criteria.
- Convenience: Easily manage and update your contact lists as your needs change.
OneDrive
Your Cloud Storage Solution
OneDrive is your personal cloud storage that allows you to access your files from anywhere, on any device. Whether you're at home, at work, or on the go, OneDrive ensures your documents, photos, and videos are always within reach.
- Anywhere Access: Store your files in the cloud and access them from your PC, Mac, tablet, or smartphone.
- File Sharing: Share files and folders with friends, family, or colleagues easily and securely.
- Collaboration: Work together on documents with real-time co-authoring in Office apps.
- Security: Your files are protected with advanced encryption and security features.
- Automatic Backup: Keep your files safe with automatic backup and sync across devices.
- Seamless Integration: OneDrive integrates seamlessly with Microsoft Office and other productivity tools.
- Generous Storage: Enjoy ample storage space to keep all your important files.
- User-Friendly: Easy to use interface that makes managing your files a breeze.
- Reliable: Trusted by millions of users worldwide for its reliability and performance.
 ©
Chicago State University
©
Chicago State University  All Rights Reserved
9501 S. King Drive Chicago, IL 60628  (773) 995-2000